


Tracking and managing website analytics is crucial for businesses aiming to understand user behavior and optimize their online presence. Google Tag Manager (GTM) is a powerful tool that allows seamless implementation and management of various tracking codes and tags without manual coding.
Google introduced Google Tag Manager in 2012. GTM provides a user-friendly interface to simplify website management of tags, scripts, and pixel tracking.
GTM introduced the concept of a “container,” which acts as a centralized hub for all tracking codes and tags deployed on a website. Instead of manually editing website code to add or update tracking scripts, users could now make changes within the GTM interface and publish them with a few clicks.
This blog will delve into GTM’s inception after Google Analytics, its importance, benefits, how it works, related terminologies, and step-by-step instructions on installing GTM on your website. By the end of this blog, you’ll be equipped with the in-depth knowledge and in-demand skills to harness the power of GTM for effective website management and tracking.
Importance Of Google Tag Manager
GTM plays a crucial role in digital marketing and website management for several reasons:
Simplified Management: GTM streamlines adding, updating, and removing tracking codes, reducing dependence on developers and facilitating faster implementation of marketing strategies.
Enhanced Flexibility: With GTM, you can dynamically adjust tags based on user interactions, events, or specific conditions, allowing for more personalized and targeted marketing efforts.
Improved Performance: By centralizing tag management, GTM effortlessly optimizes website performance by reducing the number of unnecessary scripts and ensuring smoother loading times.
Enhanced Tracking Capabilities: GTM integrates seamlessly with various analytics and marketing platforms, enabling comprehensive tracking of user interactions across different channels and devices.
Benefits Of Google Tag Manager
Time and Cost Efficiency: GTM eliminates the need for manual coding, saving time and resources associated with tag management.
Agility: With GTM, marketers can quickly adapt to changing tracking requirements and implement new strategies without extensive development cycles.
Data Accuracy: Centralized tag management reduces the risk of errors and discrepancies in tracking data, ensuring the accuracy of analytics insights.
Collaboration: GTM facilitates collaboration between marketing teams, developers, and other stakeholders, allowing for smoother coordination in implementing tracking solutions.
How does Google Tag Manager work?
GTM operates on a simple yet powerful concept of tags, triggers, and variables:
Tags: These are snippets of code or tracking pixels that collect data and send it to third-party tools like Google Analytics, Google Ads, or custom analytics platforms.
Triggers: Triggers define when and where tags should be fired based on user interactions, page views, or other website events.

Variables: Variables provide dynamic values that can be used to configure tags and triggers, such as page URLs, user attributes, or custom data layers.

Essential Terminologies in Google Tag Manager:
Container: A container is a GTM workspace where all tags, triggers, and variables are configured and managed for a specific website or application.
Workspace: GTM workspaces allow multiple users to collaborate on tag management without affecting each other’s changes until they are published.

Preview Mode: GTM’s preview mode enables users to test and
debug tags before publishing them to the live website, ensuring proper functionality and tracking.
Data Layer: The data layer, defined as a JavaScript object, helps store information about user interactions, page content, or custom events, providing a structured way to pass data to GTM and other tracking tools.
How to Create an Account and Container in Google Tag Manager:
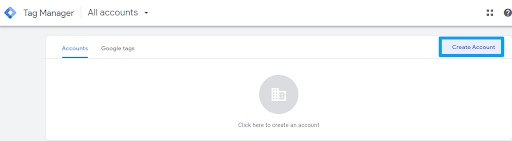
Step 1: Go to the Google Tag Manager website (tagmanager.google.com) and sign in with your Google account credentials.
Step 2: Once you’re logged in, click the “Create Account” button.
Step 3: Then, fill out the required details for your account, including the account name and, optionally, the container name (typically the website or blog name).
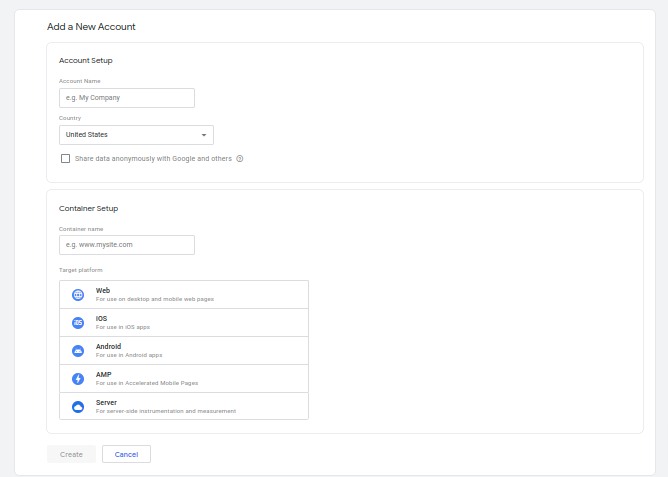
Step 4: Agree to the defined Terms of Service & click “Continue.”
Step 5: Finally, follow the prompts to complete your account and container setup.
Install the Google Tag Manager Code on Your Site:
Step 1: Google Tag Manager will provide a code snippet after creating your container.

Step 2: Copy this code snippet.
Step 3: Access your blog’s HTML source code. This can be done through your blogging platform’s admin panel or dashboard.
Step 4: Paste the Google Tag Manager code snippet into thesection of every page on your blog just before the closingtag.

Step 5: Save the changes to your blog’s HTML code.
Publish the Container:
Step 1: Return to the Google Tag Manager interface after installing the code snippet.
Step 2: Then click the “Submit” button located in the upper right corner.
Step 3: You will now be prompted to provide a name and describe the container version you are about to publish.
Step 4: Add a version name and description (optional but recommended) and click “Publish.”

How to Verify & Use Google Tag Manager:
Step 1: Login: Go to Google Tag Manager and log in.
Step 2: Create a New Tag: Click “New Tag” or “Add a new tag”.
Step 3: Name Your Tag: Give your tag a name. Let’s use “GoGoogle Configuration” here.
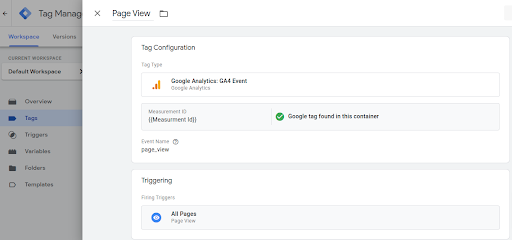
Step 4: Configure Google Analytics Tag: Click on “Tag Configuration”, choose “Google Analytics”, then “Google Tag.”
Step 5: Enter Google Tag ID: Put your Google Tag ID for your GA4 property. Optionally, create a variable to store your Google tag ID for future use.
Step 6: Set Trigger: Click “Triggering,” choose “All Pages,” and save.
Step 7: Preview: Return to the overview page and click “Preview” to test your changes.
Step 8: Connect to Your Website: Enter your website’s URL and click “Connect” to open your site in a new window for testing.
Step 9: Debugging: Use Tag Assistant to debug your tags in the preview window. Ensure your GoGoogle Configuration tag is firing on each page.
Step 10: Confirmation: The preview page should say “Connected!” Once confirmed, start debugging.
Step 11: Submit Changes: Close the testing windows, return to the overview, and click “Submit” to submit your changes.
Step 12: Publish: Add a descriptive “Version Name” and “Version Description,” then click “Publish” to apply changes to your live website.
Step 13: Check Realtime Reports: Verify hits as users navigate the website in your GA4 property’s “Realtime” report to ensure successful implementation.
Following these above outlined steps will help you effectively set up, configure, & use Google Tag Manager for tracking with GA4.
Final Words
Google Tag Manager emerges as a revolutionary platform in the web tracking arena, offering website owners and marketers a more efficient and flexible solution for managing tracking codes and tags. It helps streamline the process of managing tracking codes and tags on your website and offers numerous benefits regarding efficiency, flexibility, and data accuracy.
By switching from manual tracking implementations to GTM, businesses can streamline their tracking processes, improve data accuracy, and gain deeper insights into user behavior.
Do you aspire to become a certified Digital Marketing expert & take your digital marketing skills to the next level? Enroll in the LearNowX Digital Marketing Course to dive deeper into the digital marketing ecosystem, master advanced strategies, and gain practical skills to propel your career forward.
With the right knowledge of tools, platforms, concepts, and unmatched expertise at your disposal, you can skyrocket your online presence to recruiters and achieve remarkable career goals. Don’t miss this opportunity to enhance your skills and stay ahead in the competitive digital landscape. Kickstart your learning journey with the best digital marketing course today!


